- For a similarly named Zombies map, see Nacht der Untoten.
| Kino der Toten | |
|---|---|
| |
| Previous level | Der Riese |
| Next level | "Five" |
| Game | Call of Duty: Black Ops |
| Character | Tank Dempsey, Nikolai Belinski, Takeo Masaki, Edward Richtofen |
| Team | Original characters |
| Place | Deutsches sol Kino, Berlin, Germany |
| Date | Late 1968 or Early 1969 |
| Objective | Survive for as long as possible against limitless waves of the Undead |
| Enemies | Zombies, Hellhounds, Nova Crawlers |
| Console codename | zombie_theatre |
- "(static) Entry 741021! Perhaps the station will hold the key to the real goals of Group 935. I still do not trust my unconventional allies, but they are of great use to me. But, I digress. Who would have thought the MDT was capable of time travel? How many stations does this group have? Where did that little girl disappear to? Only time will tell what new questions awaits us in this... THEATER OF THE DAMNED! (static)"
- — Dr. Edward Richtofen
Kino der Toten (German for Cinema of the Dead) is the fifth Zombies map and the first map for Call of Duty: Black Ops, being included on the disc. The map is automatically unlocked and does not require the campaign to be completed, unlike "Five". Kino takes place in an abandoned Nazi theatre somewhere in Berlin. The original four characters, Tank Dempsey, Nikolai Belinski, Takeo Masaki and Edward Richtofen make their return as the playable characters, who have teleported from the 1940s to early 1960s.
As the first Zombies map in Black Ops, Kino der Toten features a new set of cold-war era weapons, most obtainable from the Mystery Box. Only the MP40 remains as a wall weapon from World at War. A new wonder weapon, the Thunder Gun, takes the place of the Wunderwaffe DG-2 from the previous map and is capable of clearning entire hordes of the undead.
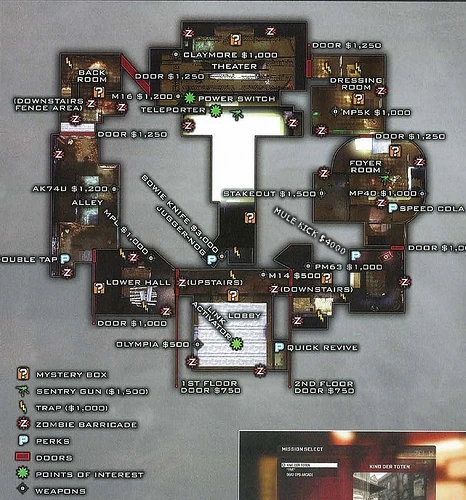
Rooms[]
Lobby/ Starting Room[]
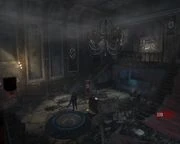
The Lobby/Starting Room.
The Lobby is where the player/s will initially spawn at the start of a match. Like most traditional starting rooms, it contains four barriers, one for each player. The M14 and Olympia make their appearence in this room, both costing 500 points to purchase. Quick Revive is also located in the Lobby to make use of the new Quick Revive solo mechanic. There is also a meteorite wedged underneath the balcony, which can be activated for the easteregg song.
There are a total of three doors leading to different rooms. One is located below the left staircase, costing 750 points, and leads to the fire trap room. Another is located at the top of the right staircase from Quick Revive, and also costs 750 points. The last is located straight ahead under the staircase and cannot be purchased; it opens once the power is turned on. Like the rest of the areas in the map, there is a single Mystery Box spawn, located on the balcony.
Once the power is turned on, the player/s can link the mainframe to the teleporter located here, in the middle of the room where the initial spawn is located. Once being transfered to the Pack-a-Punch room, the player/s will be teleported back to the starting room on the pad.
Lower Hall/Fire Trap Room[]
This room is located in-betweeen the Lobby and the Alley. Although a rather confined room, it is also the only area on the map with the Fire Trap and, previous to Ascension, the only one in Zombies. The trap sits in the middle of the room, and can be purchased for 1000 points and will last roughly 45 seconds.
There are only two barriers located in the hallway, which means camping and holding out here during the early rounds is a fair possibility. There is also a Mystery Box spawn near the exit to the Alley, which consists of a steel door and costs 1000 points.
Alley[]
The Alley is a fairly tight part of the map and zombies will spawn above from a rooftop. Double Tap Root beer is located here for 2000 points, as well as the AK74 U for 1200. There is also a Mystery Box spawn point in the middle of the area, underneath where the zombies will drop down from.
Back Room[]
This room is located above the Alley, and connects it to the stage via a staircase. The room is the smallest on the map. It is also the most simple, having a box spawn near the back, two barriers and an electric trap that can be activated for 1000 points. The meteorite for the easter egg song is also located on a shelf in the back of the room.
Upper Hall[]
The Upper Hall is the other area which can be accessed from the Lobby. It is actually two seperate rooms divided by an electrical trap, which can be activated for 1000 points. The first part, which overlooks the stage and seating area in the center of the map, contains the PM63, which is located near the balcony and costs 1000 points. A mystery box spawn and a barrier are also located here.
The other room is located above an inaccessible area, which can be seen from the middle of the room. There is another barrier here, as well as a spawn point above, in which the Zombies will jump down from via a hole in the roof. A door can be purchased here for 1000 points, which will lead players to the Foyer via a staircase. While online, Mule Kick is also located in a corner for 4000 points.
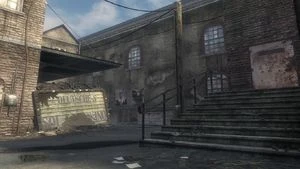
Foyer[]
The Foyer is a rather large room compared to most of the rest in the map. Due to this, taking the route through this room to the power is often considered easier than going through the alley. The Foyer, like the nearby hall, is split into two parts; the ground floor which appears to be some form of bar, and the upper floor which overlooks it. There are also two weapons; the Stakeout, which can be purchased for 1500 points, and the MP40, which costs 1000 points.
One of the two sentry guns appear in this room, being located near the bar on a table. It can be used for 1500 points. Speed Cola also makes its appearence here, costing 3000 points.
Dressing Room[]
This rather crowded room connects the main stage and the Foyer, and isn't the easiest place to horde up. There are two barriers here, however there is also a spawn point above which allows zombies to come through the roof. There is an electric trap here, costing the generic 1000 points.
An MP5k can be purchased on the wall for 1000 points. The meteorite for the easteregg song is located in a corner, close to the MP5k.
Stage/Seating[]
The stage is the furthermost part of the map from the spawn, needing a minimum of 4250 points worth of doors opened to access. It is the location of the map's power switch, which needs to be turned on to access perk-a-cola machines, the teleporter and traps. There is also the M16 and Claymores on the wall and a Mystery Box spawn in the middle.
Once the power is turned on, the stage curtains will be drawn and access to the seating area and the other half of the stage will be granted. This will also open up the door leading to the Lobby, which contains another electric trap. The seating area has the Bowie Knife purchased for 3000 points. Juggernog can also be purchased for 2500.
The stage and seating area make up the biggest room on the map, having the best training spot and the most important perk (Juggernog). There are a total of four barriers, as well as several locations where Zombies will rise from the wreckage scattered in the seating area. The only other turret on the map is located in the middle of the room, on the end of the stage, and costs 1500 points to utilise.
Once linked with the pad located in the spawn room, the teleporter, located on the side of the stage, can then be used for free. However, it must then be cooled and relinked before it can be utilised again. The teleporter will take players to the Pack-a-Punch room.
The main theater, with the stage in the back.
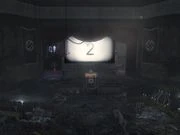
Pack-a-Punch/Projector Room[]
Once players teleport from the stage, they will be taken to this room. The Pack-a-Punch machine is located here and can be used for 5000 points. Extra frag grenades can also be bought for 250 points.
This room is the only Pack-a-Punch room/area that cannot be accessed by zombies; if nobody is located in the main part of the map then the Zombies will pile up near the seating area, which the Pack-a-Punch room is overlooking. A projector sits atop the window, which can be loaded with different projector reels located in the random rooms. The projector will project images on the screen located above the stage and have audio.
After 30 seconds, regardless if a player is mid-Pack-a-Punch, all players will be teleported out of the room (which may result in loss of weapons). A clock shows how much time is left. Each player may or may not be teleported to one of the random rooms (see below). After that, players will be teleported back to the mainframe in the Lobby/Starting Area, in which the Zombies will head straight for.
Random Rooms[]
Occasionally, after teleporting out of the projector room, players may find themselves in one of these rooms for five seconds, before being teleported to the mainframe. Sometimes they will contain a powerup, and up to three film reels can be obtained by finding them in these rooms.
Dentist's Office[]
There is also a room that looks like a dentists with a chair and large lights surrounding it. A tooth drill can be heard nearby. This seems to be one of the rooms in Verrückt.
Conference Room[]
Another room resembles one of the rooms in the map "Five", possibly the film room that is seen through the windows, or a completely different area. The film reel in this room is on the table in the middle of the room, on the projector cart on the tray below or on the top of the TV. There is also a miniature rocket on the table, just like the one in Executive Order and Ascension, which can be launched by pressing the action button near it. There's also a small television showing images of the multiplayer map Villa. There also is a picture of Richard Nixon on the desk.
Samantha's Room[]
This room contains a bed with a Monkey Bomb on it, an open toy chest in the corner that resembles the Mystery Box, a chess table with a Teddy Bear sitting in front of it, a smaller table with a teddy sitting on a chair in front of it, along with the four Perk-a-Cola bottles on top set up like a tea party and a wood carving of Der Riese with Dempsey, Nikolai, Takeo and Richtofen on top of it as little dolls and a Teddy Bear standing over them nearby. Samantha can be heard laughing and giggling along with other eerie voices whispering, children singing and a voice calling for her. The film reel is on the chess table, bed or window sill.
Samantha's Room (destroyed/zombified)[]
The room's structure is the same except there is blood splattered everywhere giving the room a deep dark red tint. It appears as everything is knocked over and/or destroyed. The room brings a more disturbing and frightening touch to the once lonely and slightly disturbing room. There is a pile of Teddy Bears covering the scale model of Der Riese with one big Teddy Bear over all. One of its eyes is glowing red, like a Hellhound's, although on the Wii it is holding a massive Bowie Knife, like the Teddy bear from the Fly Trap in Der Riese. The film reel sometimes is on the bed or standing up on the over turned table.
Call of Duty: Black Ops Zombies[]
The map appears in the iOS game Call of Duty: Black Ops Zombies, under the name Kino.
Weapons[]
| Starting Weapons |
|---|
|
M67 Grenade |
| Wall Weapons |
|---|
")
| Mystery Box Weapons |
|---|
|
CZ-75 (with or without Dual Wield) Python AUG (with Swarovski Scope) Commando FAL Famas G11 (with Low Power Scope) Galil Spectre HK21 RPK Dragunov L96A1 HS10 SPAS-12 China Lake M72 LAW Ballistic Knife Crossbow ") Thundergun ") Monkey Bomb |
")
Perks[]
| Perk-a-Cola Machines |
|---|
") Quick Revive - 1500 points (500 points solo) ") Double Tap Rootbeer - 2000 points ") Speed Cola - 3000 points Juggernog - 2500 points ") Mule Kick - 4000 points (via update) |
Gallery[]
Achievements/Trophies[]
Sacraficial Lamb (15 Gamerscore / Bronze Trophy) - Shot at or be shot by a crossbow that kills 6 or more zombies.
See Me, Stab Me, Heal Me (15 Gamerscore / Bronze Trophy) - Fire a Pack-a-Punched Ballistic Knife to revive him.
The Collector (20 Gamerscore / Silver Trophy) - Buy every weapon off the walls in a single game.
Film Reels and Radios[]
See Kino der Toten/Film Reels and Radios.